Table of Contents
Features
- Interfaces with the MindWave with the RF USB dongle for stand-alone operation
- Acquiring the Attention and Meditation eSense values from the data stream.
- Displaying your Attention level using LEDs
WARNING
NOTE: Completing this tutorial will VOID your warranty. The USB dongle will no longer work with your computer. Please visit store.neurosky.com to purchase replacement dongles
Introduction
This step-by-step guide is intended to quickly get a typical Arduino board user up and running with the MindWave. This guide will show how to setup quickly for communication with the MindWave and gives example code to parse the output stream. The parsed output stream can then be used to perform various tasks such as to control the speed of a motor, to light up LEDs, and to control the position of a servo motor, etc.
Interfacing to the MindWave
Interfacing to the MindWave requires the user to hack the USB dongle.The following describes easiest way to quickly get up and running using an Arduino board. The Arduino is sold by a vendor listed in the sources section. The MindWave and USB dongle are available at the NeuroSky Store.
Required Materials
This application requires the following materials:
- MindWave
- Arduino Diecimila or Duemilanove
- RF USB dongle
- Arduino development environment
- Avago HDSP-4832 10-Element LED bar graph array
- 4 75Ω resistors
- 6 74Ω resistors
- Breadboard
- SparkFun BOB-08745 Level Converter
- 12V Power Source (included with Arduino Board)
System Overview
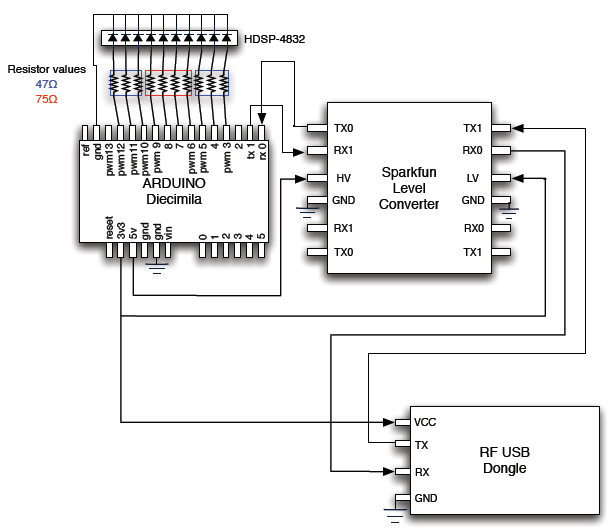
The system uses the Aduino's hardware UART for both USB communication and Bluetooth communication. After the system is up and running, the Arduino may be detached from the computer and run independently.
The basic programming flow is as follows:
- Connect the dongle to the Arduino board..
- Connect the LED array to the Arduino board.
- Download the provided example code into the Arduino board using the Arduino development environment.
- Power up the whole system and observe the Attention eSense value on the LED array.
Detailed Instructions
Connecting the dongle to the Arduino Board
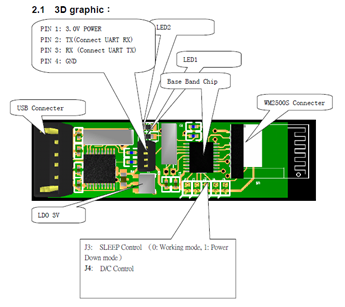
Connecting the dongle to the Arduino Board requires removing the plastic covering from the dongle and soldering wires to 4 of the pins.
- Remove the plastic covering from the USB dongle.
- Find the 4 pins, located in the center of the board.
- Starting at the end with the ‘ + ‘ sign the pin assignments are:
- Pin 1 (starting at +): 3.0 V Power
- Pin 2 : TX
- Pin 3 : RX
- Pin 4 : Ground
- Solder wires to these 4 pins, leaving enough wire to make the necessary adjustments.
Cutting Traces on the dongle
In order to for the dongle to properly receive the TX signal from the Arduino, two traces on the board must be cut. Looking at the dongle from the top, there are two traces leading from the TX and RX pins to the CH340 chip. With an X-Acto knife, cut these two traces. After the traces have been cut, check the connections with a DMM to ensure that the CH340 chip (pins 3 &4) is no longer connected to the TX and RX pins. NOTE: You will not be able to use the USB dongle with a computer after cutting the traces
Powering the Arduino
The Arduino may be powered by USB, by battery, or by an external power supply. Please see the Arduino hardware page here http://arduino.cc/en/Main/Hardware for more information.
Getting started with the Arduino development environment
Please see Arduino Getting Started guide here http://arduino.cc/en/Guide/HomePage
Arduino Code Description
Arduino code is based on the C/C++ language and requires very little else to get started. All the details or regular microprocessor development such as processor clock speed, programming speed, clock sources, etc. are all initialized by the Arduino core. With this in mind, the Arduino system will still be able to perform much of the required tasks with no problem at all. The simplicity of using the microprocessor peripherals combined with the C language along with the sample code provided provides for very quick interface to the MindSet. The user is encouraged to extend the Arduino code by appending code after the indicated section where the packet has been checked for a valid checksum.
Thereafter, the user may use the eSense values to do one of many things possible. Some of which is to control the brightness of an LED, the height of an object, etc.
The bulk of the code is used for parsing the packet data. For further information, see the MindSet Communication Protocol document in the MindSet Development tools (MDT). The MDT is available at the NeuroSky Store for free. http://store.neurosky.com
Syncing the Arduino Board
- Open Mind_Wave.pde
- Tools > Board > Arduino Diecimila
- In Control Panel > Select Device Manager
- Look in “Ports” to see which COM port the USB Serial Port is connected to
- Tools > Serial Port > Select the corresponding COM port
Running Mind_Wave.pde
- Once you have synced the program and your board, disconnect the TX and RX lines coming out of the Arduino
- File > Upload to I/O Board
- Once the program displays “Done Uploading”, you can disconnect the USB serial port and run the Arduino from independent power source.
- Reconnect TX and RX lines.
- Power up the Arduino Board via power source
- Arduino should have green PWR LED lit and dongle should have red LED lit
- Turn on Mindwave Headset
- Hit “Reset” button to pair the MindWave to the dongle.
- Once connected MindWave LED and dongle LED will both turn blue.
- Enjoy observing your Attention eSense value on the LED array.
Switching to Attention/Meditation Mode
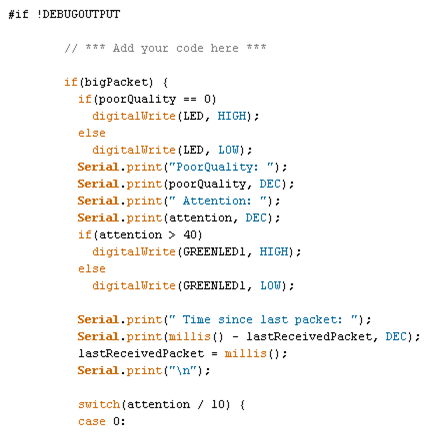
The default eSense reading in Mind_Wave.pde is attention. To switch the program to measure your meditation level, requires changing a few lines of code. Inside the pde file, locate the code shown below.

Inside these lines of code, replace “attention” with “meditation” to operate in meditation. If you are switching back to attention mode, replace “meditation” with “attention”.
The code can be downloaded here:
Mind_Wave. Note that this is in a docx format. Simply rename the extension from docx to pde and run the program.
Material Sources
The Arduino board can be obtained from:
Sparkfun Electronics
6175 Longbow Drive,
Suite 200
Boulder, CO 80301
http://www.sparkfun.com
More information about the Arduino can be found here: http://www.arduino.cc

